Developer Blog

16/11/2026 by Hannes Olin

Kvaser CanKing Remote: Access CAN buses over the network

What is CanKing Remote?

CanKing is Kvaser’s free CAN and LIN bus analysis software that is compatible with all Kvaser CAN interfaces, Kvaser LIN interfaces, Kvaser Hybrid CAN/LIN interfaces, and the Kvaser virtual CAN bus. Using CanKing , you can view messages on the bus in real time, send your own messages, and decode raw data into readable signals using database files.

Normally, that means working with a Kvaser CAN interface connected to the same computer. But what if the CAN interface is somewhere else, such as on a test bench, in a lab or connected to a vehicle?

CanKing Remote lets you access those CAN interfaces over a network. Instead of moving your computer to the CAN hardware, you can monitor and interact with the bus from another machine. This can be useful for remote testing, diagnostics and development, or simply when the CAN connection is somewhere that is inconvenient to access directly.

CanKing consists of three parts: CanKingService, a background service that talks to the Kvaser CAN interfaces; a graphical application for interactive use, which includes a built-in terminal; and the ck command-line tool for scripting and automation.

In this article we will explore how to set up remote access to the CanKingService, so that other devices can reach the CAN interfaces connected to that machine over the network. With either the CanKing GUI or the ck command-line tool, you can work with CAN buses on a test bench, in a lab or in a vehicle, right from your desk. This guide is based on the Remote Access documentation supplied with CanKing. For the latest CanKing downloads and information, visit the CanKing 7 page.
How does CanKing Remote work?

Normally, the CanKing GUI and the ck command-line tool connect to a CanKingService running on the same machine. When remote access is enabled, CanKingService also listens for connections from other devices on the network on a dedicated port. Clients then connect to the service using its URL, and from that point they work just as they would locally.

The connection is protected in two ways. A TLS certificate, generated on the server and shared with each client, lets the client confirm that it is talking to the right server and encrypts all traffic between them. An API key, a shared secret set on the server, proves to the server that the client is allowed to connect. Together, they make sure that only trusted clients can reach the CAN interfaces, and that no one else can read or change the data in transit.

Setting up the server

Install the latest version of CanKing
Start by downloading and installing the latest version of CanKing, available for Windows and Linux here.

Generate the TLS certificate
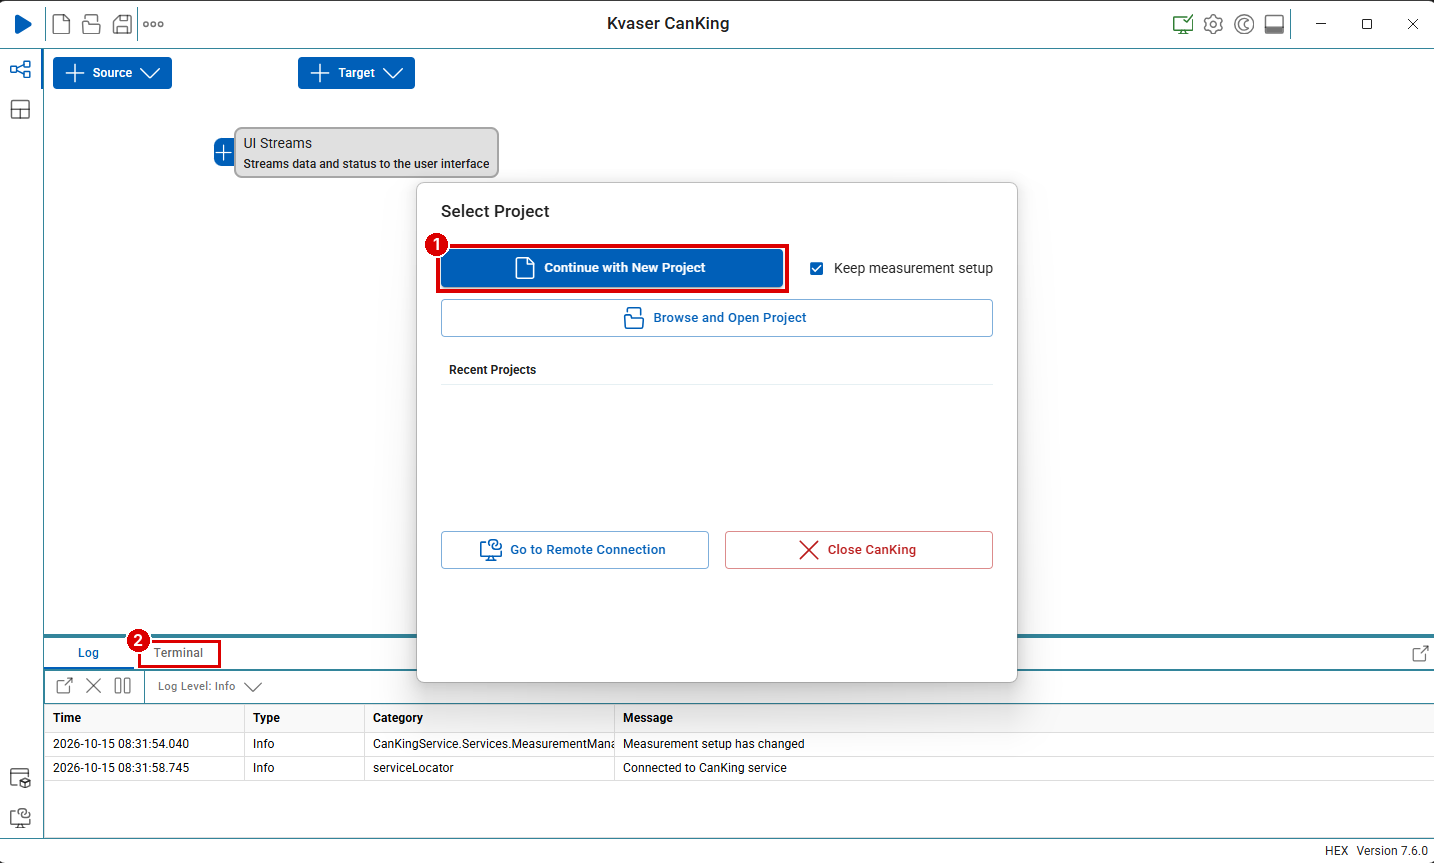
Once CanKing is installed, open the application, click Continue with New Project (1) and then open the Terminal tab at the bottom of the window (2).

Note: If you prefer working in a regular terminal, you can run the same commands from there instead.

Run the command below in the terminal in CanKing to print your machine’s hostname:

hostname

This will print your machine’s hostname, for example:

my-hostname

Next, we will generate the TLS certificate. To do so, run the command below using the hostname of your machine:

ck remote generate-cert <HOSTNAME>

The hostname you give is written into the certificate as the name the server is known by. When a client connects, it checks that the hostname in the URL matches a name in the certificate.

Example of creating a certificate on a Windows machine with my-hostname:

ck remote generate-cert my-hostname

Output:

Success: Certificate generated: C:\ProgramData\Kvaser\CanKing\ca-certificates\my-hostname.pfx

Next steps:
  1. Run 'ck remote enable --cert-path <path>' to enable remote connections.
  2. Distribute the public certificate to clients that need to trust this server.
     Public certificate saved to: C:\Users\MyUser\Documents\my-hostname.pem

On success, two files are created:

  • my-hostname.pfx is the private server certificate. It must stay on the server, which is the machine running CanKingService, and is saved in the default certificate directory.
  • my-hostname.pem is the public certificate. Clients use it to verify that they are connecting to the right server, and it is saved in the directory where you ran the command.

The default certificate directory is:

Windows:

C:\ProgramData\Kvaser\CanKing\ca-certificates

Linux:

/usr/share/Kvaser/CanKing/ca-certificates

Enable remote access

With the certificate in place, you can now enable remote access in CanKingService. Run ck remote enable, passing the path to the certificate you just created and an API key:

ck remote enable --cert-path <cert-path> --service-api-key <service-api-key>

Important: Use the .pfx file, not the .pem file.

Example of enabling remote access on a Windows machine:

ck remote enable --cert-path "C:\ProgramData\Kvaser\CanKing\ca-certificates\my-hostname.pfx" `
  --service-api-key a-strong-secret

Replace a-strong-secret with an API key of your choice. The key works like a shared password: you decide what it is, and clients must supply the same value to connect to the server. We recommend choosing a long, random string, since the key is what keeps the connection secure.

Output:

Success: Remote connections enabled. CanKingService is restarting.

  Certificate:     C:\ProgramData\Kvaser\CanKing\ca-certificates\my-hostname.pfx
  Port:            36701

CanKingService restarts automatically and starts listening for remote connections on port 36701, the default. To use a different port, add --port followed by the port number to the command.

The server side is now set up, and clients can connect to CanKingService.

Connecting clients

With the server ready, it’s time to set up the client: the machine you want to work from. Install CanKing, follow the steps below, and you’ll have the full power of CanKing on the server’s CAN buses, right from your desk.

Copy the public certificate

Start by copying the public certificate, the my-hostname.pem file in the example above, from the server to the client. Any file transfer method works, such as a USB drive, a network share or scp. Only copy the .pem file. The .pfx file must never leave the server. In this example, we use a USB drive.

Find the certificate on the server
When you generated the certificate, the output showed where the public certificate was saved:

     Public certificate saved to: C:\Users\MyUser\Documents\my-hostname.pem

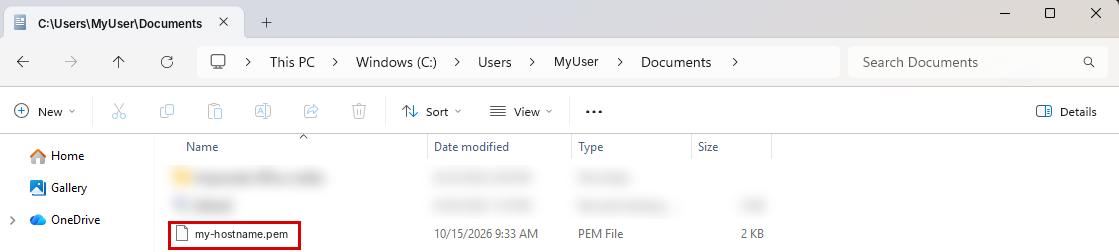
On the server, open File Explorer and go to that folder, in this example C:\Users\MyUser\Documents.

Note: Windows hides file extensions by default, so the file may be shown as my-hostname with the type PEM File.

Copy it to the USB drive
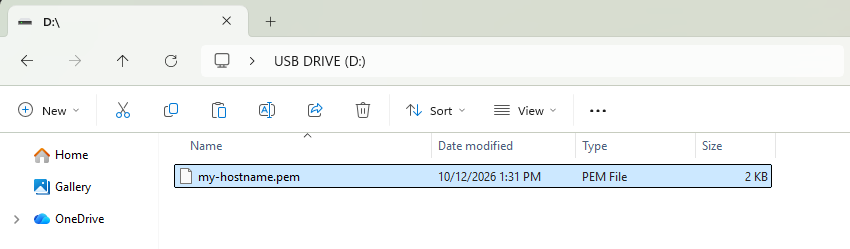
Plug the USB drive into the server. Right-click my-hostname.pem, select Copy, then open the USB drive in File Explorer, right-click in an empty area and select Paste.

Eject the USB drive and plug it into the client. The next step is to place the certificate where CanKing on the client can find it.

Trust the server certificate

Before the client can connect, it needs to trust the server’s certificate. CanKing looks for trusted certificates in its ca-certificates folder, which the installer doesn’t create. You need to create the folder and copy the certificate into it, either with File Explorer or from the command line.

Using File Explorer (Windows)
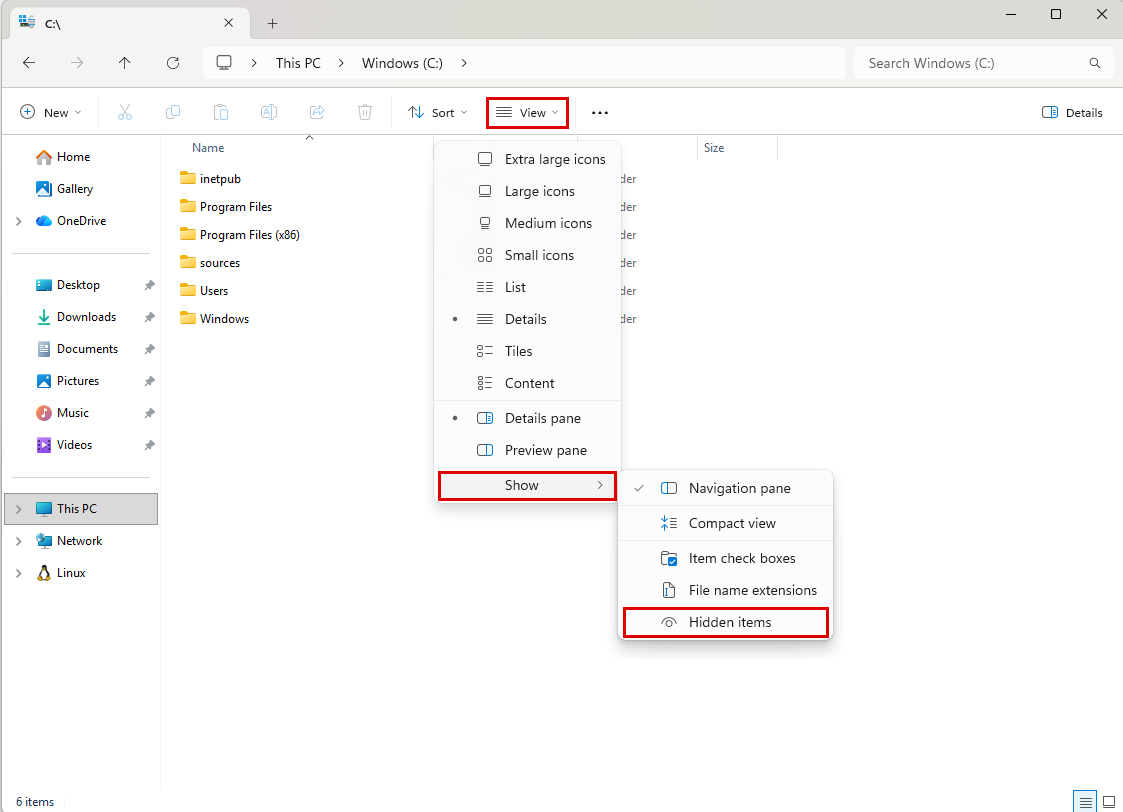
The CanKing folder is located under C:\ProgramData, which Windows hides by default. To show it, open File Explorer, click View, then Show, and select Hidden items.

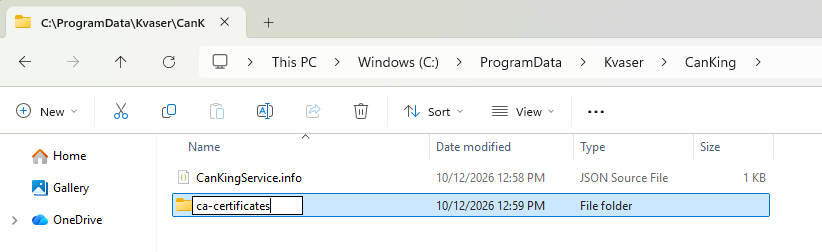
Navigate to C:\ProgramData\Kvaser\CanKing. Right-click in an empty area, select New → Folder, and name the new folder ca-certificates.

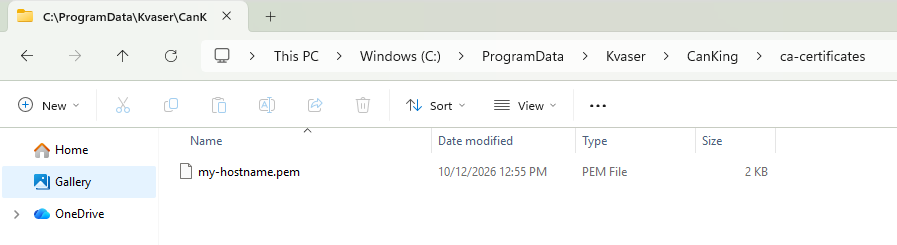
Open the ca-certificates folder and copy my-hostname.pem into it from the USB drive.

Tip: Instead of showing hidden items, you can also type C:\ProgramData\Kvaser\CanKing directly into File Explorer’s address bar.

Using the command line
Alternatively, open a terminal in the folder where you saved the .pem file, then create the folder and copy the certificate into it:

Windows (Powershell):

New-Item -ItemType Directory -Force $env:ProgramData\Kvaser\CanKing\ca-certificates
Copy-Item .\my-hostname.pem $env:ProgramData\Kvaser\CanKing\ca-certificates\

Linux (bash):

sudo mkdir -p /usr/share/Kvaser/CanKing/ca-certificates
sudo cp my-hostname.pem /usr/share/Kvaser/CanKing/ca-certificates/

Connect with the CanKing GUI

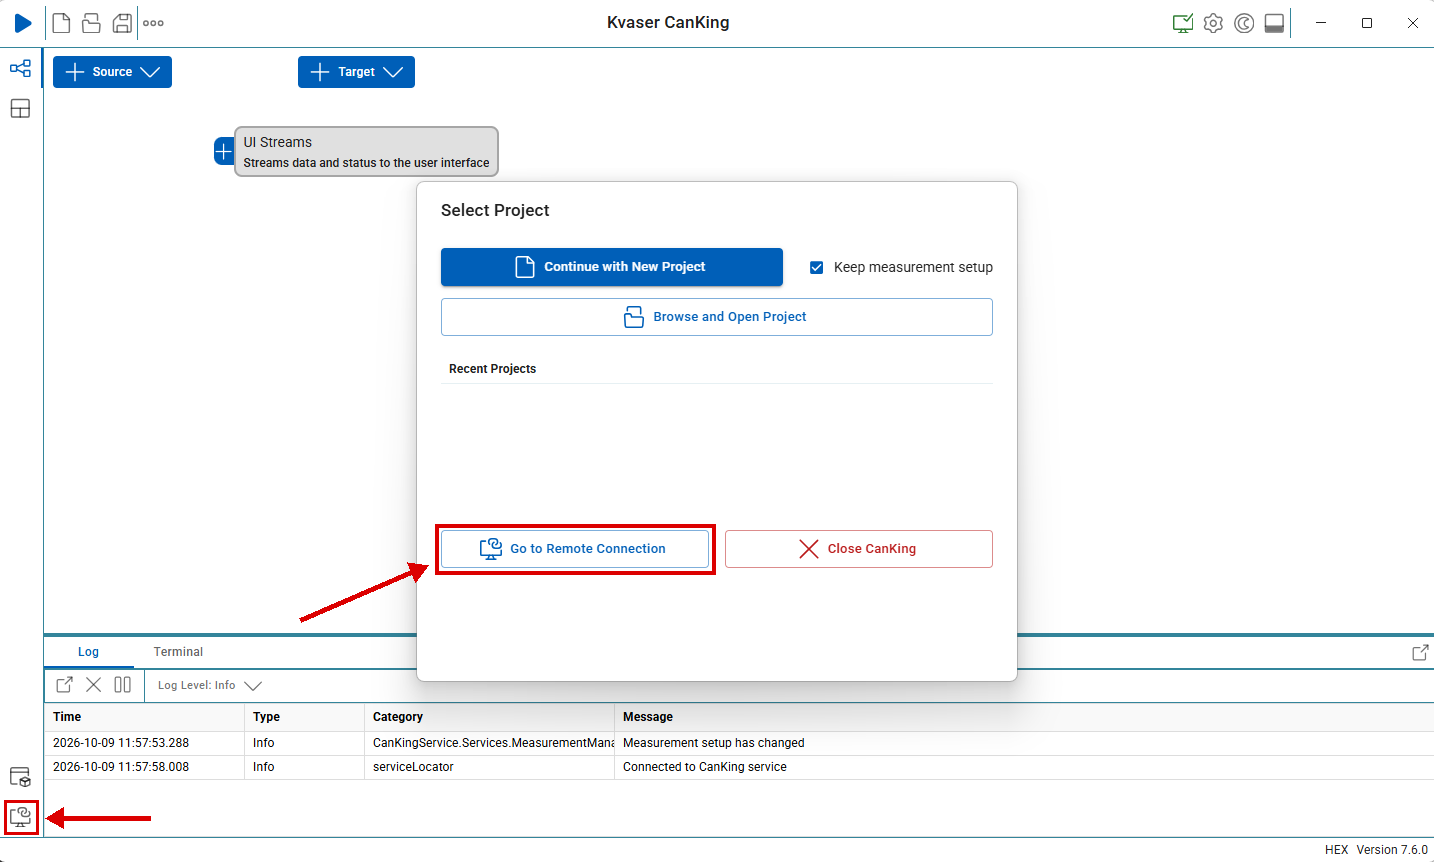
Now that the client trusts the server’s certificate, you’re ready to connect. When you open CanKing, the Select Project dialog is shown. Click Go to Remote Connection to open the remote connection page. You can also get there at any time by clicking the Remote Connection icon at the bottom of the left-side navigation bar.

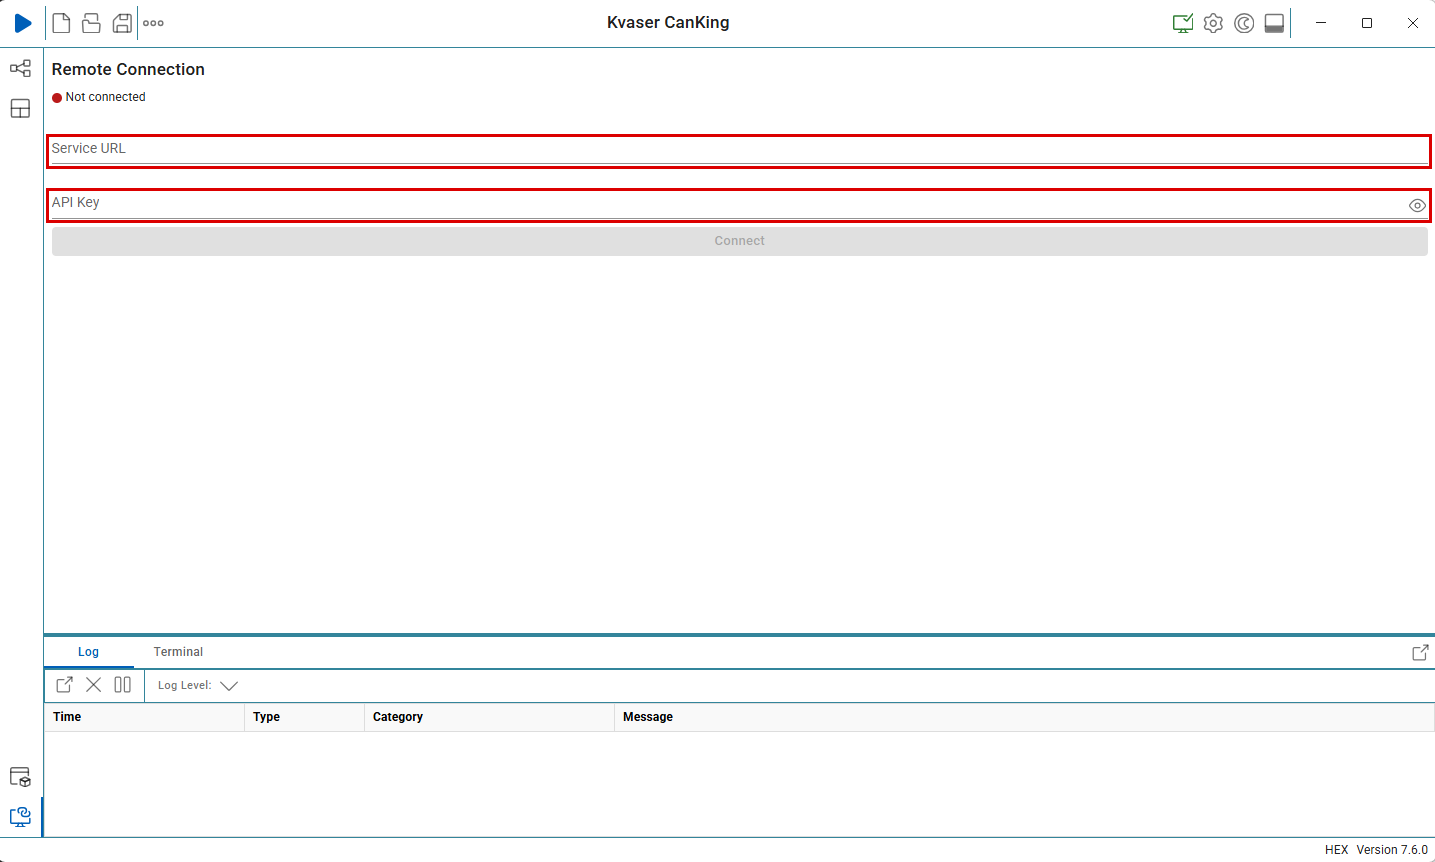
On the Remote Connection page, enter the Service URL and the API Key you chose on the server, then click Connect. The Service URL is made up of the server’s hostname and the port CanKingService listens on, in this example https://my-hostname:36701.

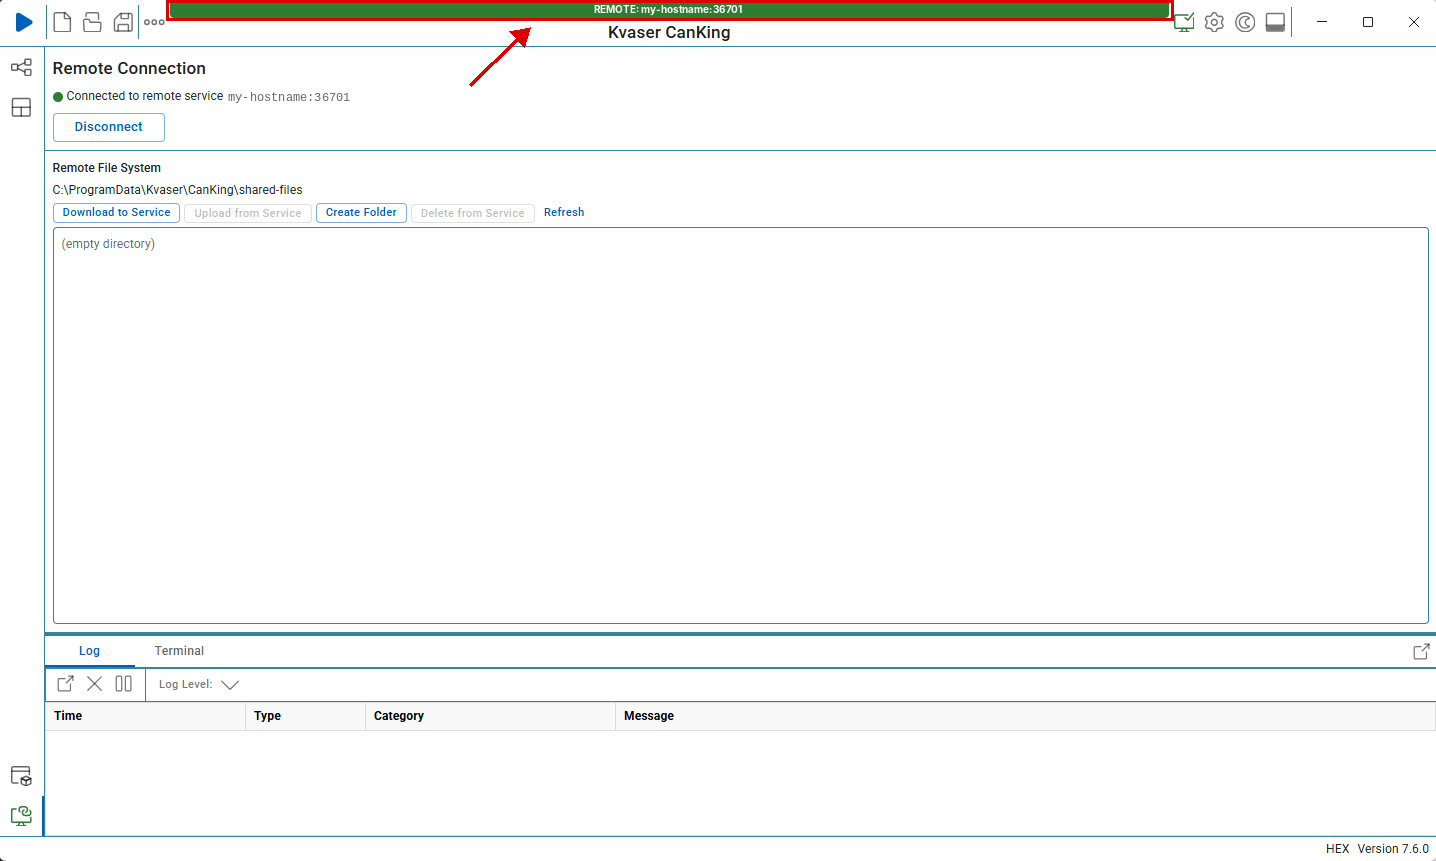
When the connection is established, a green banner showing the address of the remote service appears at the top of CanKing’s window. The page also confirms that you’re connected and shows the server’s shared files folder. Click Disconnect to go back to your local CanKingService.

Connect with the ck command-line tool

Every ck command accepts --url and --api-key flags, which tell it which service to connect to and which API key to use. Use the same URL and API key as in the GUI:

ck get about --url https://my-hostname:36701 --api-key a-strong-secret

If the connection works, the response shows the version of the remote CanKingService.

To avoid typing the server address and API key on every command, set them as environment variables instead:

Windows (PowerShell):

$env:CANKING_REMOTE_URL = 'https://my-hostname:36701'
$env:CANKING_REMOTE_API_KEY = 'a-strong-secret'

Linux (bash):

export CANKING_REMOTE_URL='https://my-hostname:36701'
export CANKING_REMOTE_API_KEY='a-strong-secret'

These variables only last for the current terminal session.
Then check the connection by starting ck in interactive mode:

ck

The prompt shows the address of the service that ck is connected to. If it shows https://my-hostname:36701, you’re connected to the remote CanKingService. Type exit to leave interactive mode. From now on, every ck command you run in this session goes to the remote server.

Success: New session started.

Connected to CanKingService at https://my-hostname:36701
Entering interactive mode. Type 'exit' to quit. Type 'ck --help' to show help.

CK https://my-hostname:36701>

That’s it! CanKingService is now reachable over the network, protected by a TLS certificate and an API key, and you can work with the server’s CAN interfaces from your desk using either the CanKing GUI or the ck command-line tool.

For more details on remote access, including all available options and alternative ways to configure CanKingService, see the Remote Access documentation that ships with CanKing:

Windows:

C:\Program Files\Kvaser CanKing\service\REMOTE_ACCESS.md

Linux:

/opt/canking/service/REMOTE_ACCESS.md

About the author

Hannes Olin is an Application Engineer at Kvaser, where he helps users solve technical challenges and get the most out of their applications. His work combines hands-on troubleshooting with practical knowledge of Kvaser hardware and software. Through his DevBlog posts, he shares technical insights, practical examples, and solutions drawn from real-world engineering challenges.

Author Image

Kvaser Marketing