In this article, we take a look at the Kvaser DIN Rail and how to control this device using CANlib.
Developer Blog
Kvaser DIN Rail – Remote Device With I/O Pins
Overview HW
The Kvaser DIN Rail family is a collection of Ethernet to CAN/CAN FD interfaces with support for I/O ports via add-on modules. The housing has a mounting clip that attaches to a 35 mm Top Hat DIN rail for easy installation. The I/O pins can be controlled either from Kvaser’s CANlib SDK (over Ethernet) or directly on the unit using Kvaser t programs. The I/O modules currently available are:
• Digital add-on module with 16 inputs and 16 outputs, Kvaser DIN Rail S010-X10 (01065-9)
• Analog add-on module with 4 inputs and 4 outputs, Kvaser DIN Rail S020-X10 (01066-6)
• Relay add-on module with 8 relay outputs and 8 digital inputs, Kvaser DIN Rail S030-X11 (01067-3)
Up to four, optional, add-on modules (in any combination) may be attached to the side of the base module.
Connecting the Kvaser DIN Rail
In order to use the Kvaser DIN Rail, a compatible version of the Kvaser driver and firmware must be installed. The latest version of the driver and firmware can be downloaded from https://www.kvaser.com/download. The next step is to find and connect the Kvaser DIN Rail using the Kvaser Network Device Selector found in Kvaser Device Guide. Please refer to the Kvaser DIN Rail User’s Guide, which can also be downloaded from https://www.kvaser.com/download for more details of the initial setup.
Connecting Digital Out to Digital In
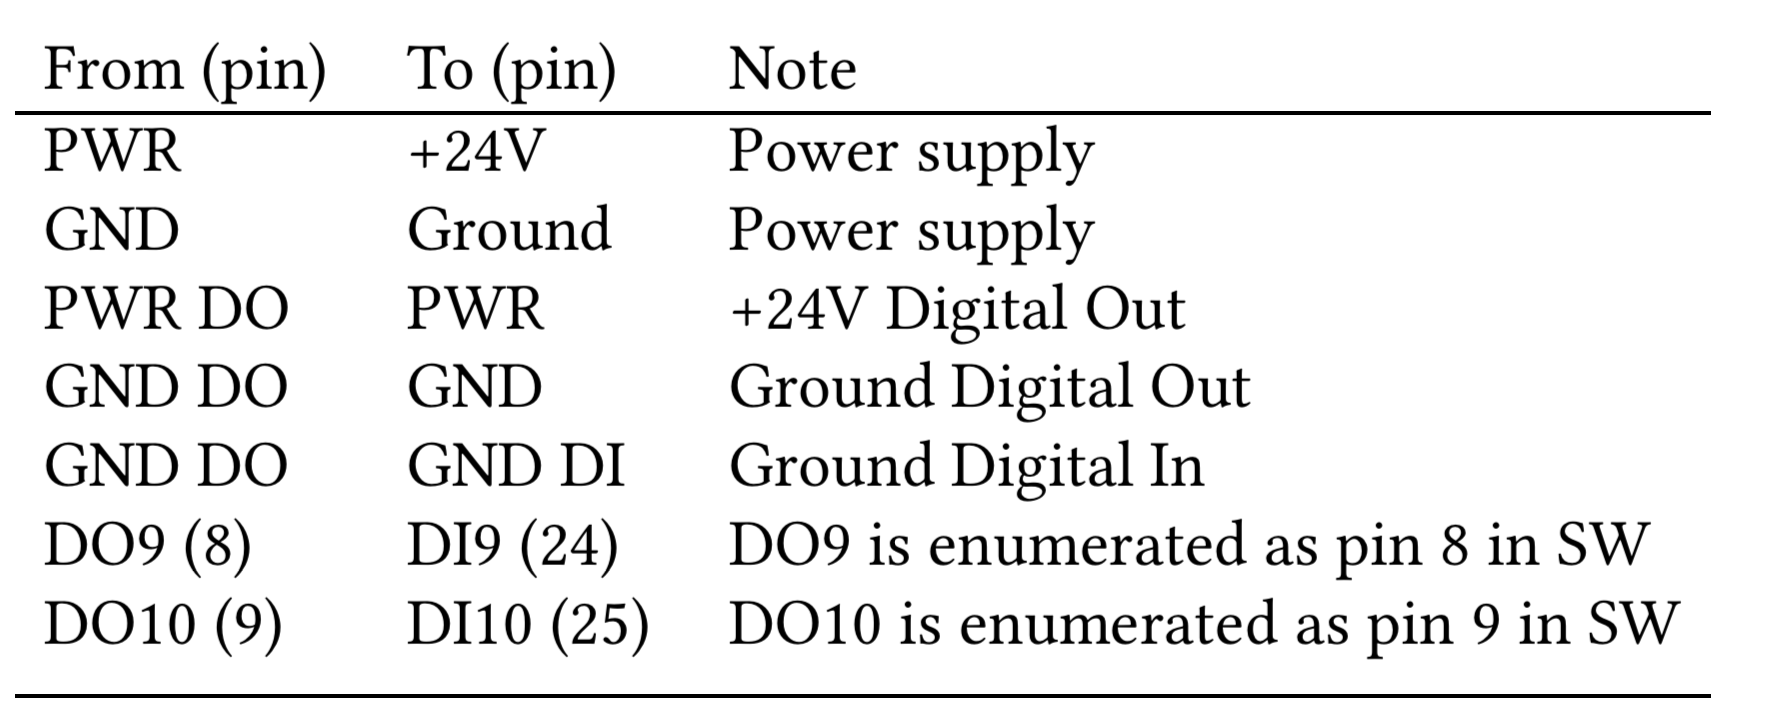
I’m using a Kvaser DIN Rail with one Digital add-on module.1 I have also made the following connections on the Digital add-on module:

The Digital In will be read relative to GND DI and the Digital Out will be set relative to GND DO, so we need to connect GND DI to GND DO in order to read the output value correctly.
DO9, DI9 and so on is the marking on the add-on module, when enumerated, these will be given pin number 8 and pin number 24 respectively, given that we have only connected a Digital add-on module.
I/O Enumeration and Confirming Configuration
The base module supports up to four add-on modules in any configuration. The base module enumerates the I/O pins on the add-on modules with consecutive integer pin numbers starting with 0 for the first pin on the first module, 1 for the second pin on the first module, and so on until the last pin on the last module. Removing, adding or changing the order of the add-on modules will cause the base module to re-enumerate all I/O pins to match the new configuration and set all output I/O pins to zero.
As a cautionary measure, before confirming a new configuration (i.e. a new enumeration of the I/O pins), we can only retrieve information about the pins. After we have confirmed the configuration, we may set and read values on the pins.
Setting and Reading Pin Values Using Python canlib
Before continuing, let’s take a look at a small examples which does the basic setup and then sets and reads some Digital pins.
# iopin.py
from canlib import canlib, Device

# find device with correct serial number, my device has serial number 225
device = Device.find(serial=225)

# get current CANlib channel number of the device
channel = device.channel_number()

# print the name of the device
chd = canlib.ChannelData(channel)
print(f"Channel name: {chd.channel_name}")

# open the device with this CANlib channel number
ch = canlib.openChannel(channel)

# how many I/O pins does this device have?
number_of_pins = ch.number_of_io_pins()
print(f"Number of I/O pins: {number_of_pins}")

# look at some pins
pin_8 = ch.get_io_pin(8)
pin_24 = ch.get_io_pin(24)
print(f"{pin_8}\n{pin_24}")

# confirm configuration
ch.io_confirm_config()

# show current pin values
print(f"Values: pin 8: {pin_8.value}, pin 24: {pin_24.value}")

# set a digital out and show changes
print("Setting pin 8 to '1'")
pin_8.value = 1
print(f"New values: pin 8: {pin_8.value}, pin 24: {pin_24.value}")

# set another digital out
print("Setting pin 9 to '1'")
ch.get_io_pin(9).value = 1

# show current pin values
pin_values = [ch.get_io_pin(i).value for i in range(number_of_pins)]
print(f"pin_values: {pin_values}")

# close CANlib channel
ch.close()
Running the above code results in the following on the screen:
Channel name: Kvaser DIN Rail SE400S (Remote) (channel 0)
Number of I/O pins: 32
Pin 8: <PinType.DIGITAL: 1> <Direction.OUT: 8> bits=1 range=0.0-24.0 (<ModuleType.DIGITAL:
      1>)
Pin 24: <PinType.DIGITAL: 1> <Direction.IN: 4> bits=1 range=0.0-24.0 HL_filter=5000
      LH_filter=5000 (<ModuleType.DIGITAL: 1>)
Values: pin 8: 1, pin 24: 0
Setting pin 8 to '1'
New values: pin 8: 1, pin 24: 0
Setting pin 9 to '1'
pin_values:[0,0,0,0,0,0,0,0,1,1,0,0,0,0,0,0,0,0,0,0,0,0,0,0,1,1,
      0, 0, 0, 0, 0, 0]
Verifying Configuration in Python canlib
As previously stated, a configuration needs to be confirmed before any values on pins may be read or set. The reason being that if you set the wrong output in a live installation, bad things may happen. So let us take a look at how to verify a configuration using the Python wrapper.
In the Python canlib package, we can define our own module specification which can be compared to the actual configuration before confirmation. Any attributes in the module specification set to ‘None‘ is automatically considered fulfilled. The actual comparision is done using ‘Configuration.issubset(module_spec)‘. This means that it is possible, but not needed, to set constraints on the firmware version or serial number of the add-on modules.
# iopin_configuration.py
from canlib import canlib, Device
import canlib.canlib.iopin as iopin

# connect to DIN Rail, my device has serial number 225
channel = Device.find(serial=225).channel_number()
with canlib.openChannel(channel) as ch:

    config = iopin.Configuration(ch)
    print(f"Connected modules: {config.modules}")

    # we expect to find one single Digital add-on module
    module_spec = [iopin.AddonModule(module_type=iopin.ModuleType.DIGITAL)]

    print(f"Our spec: {module_spec}")
    is_config_ok = config.issubset(module_spec)
    print(f"Is the config fulfilling our spec? {is_config_ok}")
    if is_config_ok:
        # confirm configuration
        ch.io_confirm_config()